Welcome to Art Class at B. Bernice Young School!
Virtual Learning Week 5
I hope you had a restful, fun, and wacky Spring Break!

These online art lessons are provided to you electronically in order to continue art instruction at home while school is closed.
Please scroll down and find your grade level lesson. Be sure to also check out the optional art challenge of the week! This week's challenge celebrates Earth Day!
Feel free to adapt each lesson with art materials that you have available at home.
Each lesson is open ended and promotes student choice. Try your best and have fun!
When your artwork is complete please email me a photo of your work and include your name and classroom teacher's name in the email.
I can't wait to see your beautiful artwork!
When your artwork is complete please email me a photo of your work and include your name and classroom teacher's name in the email.
I can't wait to see your beautiful artwork!
If you have any questions or concerns please email Mr. Giannetto.
Please also follow me on Facebook: Young School Art with Mr. Giannetto
and Instagram @youngschoolartwithmr.g for additional art activities.
I have created numerous art lessons on the educational website Mr. Giannetto for Fantastic Fun and Learning which can be an additional art resource for you. The art activities can be adapted and modified for your child's age and ability level. This creative play art activity combines air dry clay and pipe cleaners and is great for fine motor skill development.
Give it a try!
Give it a try!

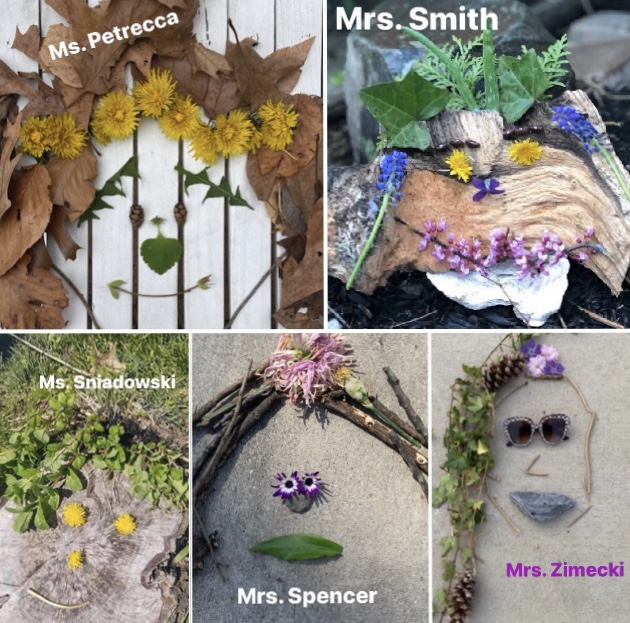
Earth Day Art Challenge of the Week: Nature Portraits
This is an optional art activity for all Young School students, families, and staff.
This challenge is inspired by the Instagram account @facethefoliage.
This challenge is inspired by the Instagram account @facethefoliage.
Challenge: Create a face using things found in nature such as leaves, sticks, flowers, rocks, grass, and more.
 |
| Portraits created by Mr. G and Jessica Spencer. Thank you Jess! |
Congratulations Young School Artists!
I'm so proud of all my students who have been creating fantastic artwork at home! Here's a shoutout to Young School's Distance E-Learning Star Students of the week!
(All photos are posted with parental permission. Additional artists will be highlighted each week.)


Kindergarten-Paper Flower Craft

Materials: construction paper, pencil, scissors, glue, paper tube, paint, q-tips
Step 1: Use a paper tube to stamp circles onto blue paper. If paint is not available use a blue crayon to draw circles on the paper.
 Step 2: Begin to make your paper circles. These will be the center of the flower and the petals. Use a small cup to trace 6-8 circles for the petals. Make one extra circle that will become the center of the flower.
 Step 3: Cut out the circles and fold 6-8 circles in half to make the petals.
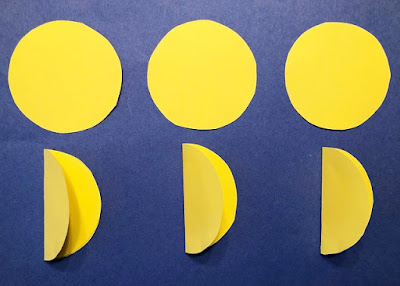
Step 4: Glue on one circle for the center of the flower. Glue the folded circles to create each petal.


Step 4: Glue on one circle for the center of the flower. Glue the folded circles to create each petal.
Step 5: Add details to your project including a stem, leaves, and soil. If you wish to have the leaves pop up, fold green paper in half and draw half of the leaf on the fold. When you cut it out you will have a complete leaf.


Step 6: Use a q-tip to paint seeds inside the center of the flower. If paint is not available use markers or crayons.

Talk About Art: How many circles do you see in your artwork? What does your flower need in order to grow? Can you spot any flowers like this in your yard or neighborhood?
1st Grade-Cactus Friends

Materials: pencil, construction paper, crayons, markers, paint, brush, scissors, glue
Step 1: Draw a cactus in a pot. A rectangle or square can make a nice pot. For the cactus draw a long curved shape coming out from the top of the pot. Add the arms as you like.


Step 2: Paint the cactus light green by adding some green paint to white paint in order to create a tint of green. Paint the pot whatever color you wish. Let the paint dry.

Step 3: After the paint dries use markers to add details to the cactus. Trace the cactus with a green marker and add black spines. Trace the pot and add details.

Step 4: Use crayons to draw a variety of lines in the background. Can you draw straight, curvy, zigzag, spiral, and dotted lines? Can you make a pattern?

Step 5: Add a face to the cactus. Cut out two small white circles and glue them down to make eyes. Add a black eyeball, nose, mouth, eyebrows, eyelashes, and other details with markers. Think about if you want to create a happy, surprised, or excited cactus.


Talk About Art: Name your cactus friend. How is he or she feeling? Happy? Excited? Surprised? Shy? Identify the different types of lines in the background of your picture. Did you create a pattern?
2nd Grade-Earth Day

Materials: newspaper, pencil, scissors, glue, watercolor paint, brush
Warm-Up: Introduce/review the following terms: Reduce (use less), reuse (use again), recycle (reprocess into new item).
Step 1: Draw a large circle to represent the earth on a piece of newspaper. Trace a plate to make the circle if you wish. Draw the large land areas on the earth.

Step 2: Use watercolors to paint the land green and water blue. Let your work dry.


Step 3: Draw 3 arrows on newspaper and cut them out. To make an arrow draw one long thin rectangle and draw a triangle on the end. If you wish cut out all three arrows at once by layering your paper before you cut.
Step 4: Cut out the earth and glue it to a piece of paper. Fold the arrows in half and glue them around the earth.


Talk About Art: Discuss examples of how you reduce, reuse, and recycle every day.

Step 2: Use watercolors to paint the land green and water blue. Let your work dry.


Step 3: Draw 3 arrows on newspaper and cut them out. To make an arrow draw one long thin rectangle and draw a triangle on the end. If you wish cut out all three arrows at once by layering your paper before you cut.
Step 4: Cut out the earth and glue it to a piece of paper. Fold the arrows in half and glue them around the earth.


Step 5: Cut out letters from the newspaper to spell reduce, reuse, or recycle and glue them to your paper.
Talk About Art: Discuss examples of how you reduce, reuse, and recycle every day.
The Burlington Township School District is committed to making our website accessible for students, staff, and the community. You may request information in an alternate format. Please contact the community relations office to make requests.
No comments:
Post a Comment