Welcome to Art class at B. Bernice Young School
Week 11: Nature Week
This week we'll be combining art and nature to create unique and one of a kind creations! Below you'll find Mr. G surrounded by cacti in Arizona, hiding in the trees of Key West, exploring waterfalls in California, and taking in the beauty of Sedona.

You can certainly find natural beauty closer to home whether you head out to your backyard, take a walk around the block, or visit a nearby park. You're sure to find rocks, leaves, sticks, flowers, and more as you explore your surroundings. Those items can be used to create fantastic artwork!
Let's go outside and make art!
Please choose one of the nature art projects options below for art class this week. Scroll down for the step-by-step directions. You are free to substitute art materials and supplies as need be. If the weather is not cooperating and/or you are not able to go outside to collect materials please consider drawing something found in nature such as flowers, leaves, mountains, etc. to receive art participation credit for the week. Have fun! I can't wait to see what you make!
Pick one of the following nature art projects:
Option 1. Build a Small World with Nature
Option 2. Turn a Leaf into an Animal
Option 3. Found Object Nature Portraits
Option 4. Rock Painting
Option 5. Watercolor Leaf Prints

When you complete your art project please email me a photo of your artwork and include your child's name and classroom teacher's name.
If you have any questions or concerns please email Mr. Giannetto.
Please follow me on Facebook: Young School Art with Mr. Giannetto
and Instagram @youngschoolartwithmr.g for additional art activities.
Please scroll down to the bottom of the page to view
Young School's Star Students of the Week!
Option 1: Build a Small World with Nature


I created this lesson for the educational website Fantastic Fun and Learning. Please click the link and follow the directions to make your small world. Options include creating a fairy castle, bug motel, gnome home, or a land yet to be discovered.
Option 2: Turn a Leaf into an Animal

Materials: leaves, construction paper, glue, scissors
Optional: paint, cardboard, feathers
Warm Up: What type of animal would you like to make out of leaves? Maybe a bird, a deer, a cat, a mouse, or an owl.
Step 1: Collect a variety of leaves and pick one to glue to a piece of paper.
 |
| Photos/artwork above are from i Creative Ideas |
Step 2: Add other leaves to complete your animal. You may cut them if you wish. Think about the parts of the animal you are making. Does your animal have a tail or horns or four legs?

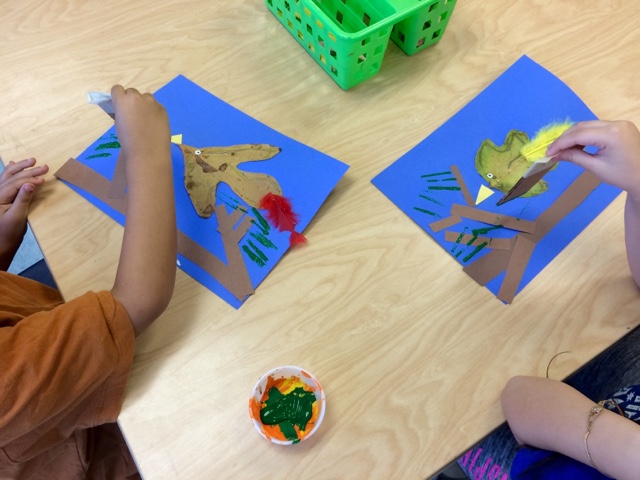
Step 3: If you wish, add construction paper details to your animal such as a triangle beak for a bird. Add a feather if you have one available.
Step 4: Create an environment for your animal. Below artists are making tree branches for their birds. To make the tree branches cut strips of brown paper and glue them to blue paper.

Step 5: Add leaves to the branches by using pieces of green construction paper or tissue paper. Or use a piece of cardboard and stamp the pine needles with green paint.


Option 3: Found Object Nature Portraits

Option 4: Rock Painting

This challenge is inspired by the Instagram account @facethefoliage.
Challenge: Create a face using things found in nature such as leaves, sticks, flowers, rocks, grass, and more.
Step 1: Collect an array of items from nature.
Step 2: Identify parts of the face and sort the items into categories such as eyes, noses, mouths, hair, ears, and such.
Step 3: Create a portrait using the objects. Move the items around to see what works best!
Modifications: 1. Create a self-portrait nature face by looking in a mirror as you're working.
2. Make your nature face symmetrical (same on both sides).
3. Sketch a drawing of your finished work.
2. Make your nature face symmetrical (same on both sides).
3. Sketch a drawing of your finished work.

Materials: rocks, acrylic paints, brushes, sharpie
Optional: googly eyes, bubble wrap, spray fixative
Warm Up: Decide what you would like to paint on your rocks. Maybe your favorite animal, cartoon character, or a self-portrait.
Step 1: Collect a variety of different shape rocks. Clean and dry each rock.
Step 2: Use a black sharpie to draw your image on the rock.
Step 3: Paint the rocks. be sure to wash your brush in-between colors. Also, dry your brush before dipping it into the paint. A very wet brush can cause the paint to run when you begin to pant.


Step 4: After the paint dries glue any details you wish onto the rock such as googly eyes, feathers, or bubble wrap.


Step 5: If you are going to place your rock outside spray it with a fixative so that it is protected from the elements.
Option 5: Watercolor Leaf Prints


I created this lesson for the educational website Fantastic Fun and Learning. Please click the link and follow the directions.
Congratulations Young School Artists!
You are fantastic artists!
(All photos are posted with parental permission. Additional artists will be highlighted each week.To have your child participate please include permission to post in your email).


he Burlington Township School District is committed to making our website accessible for students, staff, and the community. You may request information in an alternate format. Please contact the community relations office to make requests.


