Monday, October 11, 2021

Remote Art Class: Week 6

 Welcome to Remote Art Class with Mr. Giannetto

2021-2022 School Year

Scroll down to view art projects and resources for Week 6.

Here are over 30 art projects that I created for the early education site Fantastic Fun and Learning. Choose any two that you would like to complete for this week. Have fun! 

https://www.fantasticfunandlearning.com/?s=giannetto


Monday, October 4, 2021

Remote Art: Class Week 5

                   Welcome to Remote Art Class with Mr. Giannetto

2021-2022 School Year

Scroll down to view art projects and resources for Week 5. 

Paper Flower Craft 


Materials: construction paper, pencil, scissors, glue, paper tube, paint, q-tips 

Step 1: Use a paper tube to stamp circles onto blue paper. If paint is not available use a blue crayon to draw circles on the paper. 


Step 2: Begin to make your paper circles. These will be the center of the flower and the petals. Use a small cup to trace 6-8 circles for the petals. Make one extra circle that will become the center of the flower. 
  
Step 3: Cut out the circles and fold 6-8 circles in half to make the petals. 


Step 4: Glue on one circle for the center of the flower. Glue the folded circles to create each petal. 

Step 5: Add details to your project including a stem, leaves, and soil. If you wish to have the leaves pop up, fold green paper in half and draw half of the leaf on the fold. When you cut it out you will have a complete leaf.


Step 6: Use a q-tip to paint seeds inside the center of the flower. If paint is not available use markers or crayons. 


Talk About Art: How many circles do you see in your artwork? What does your flower need in order to grow? Can you spot any flowers like this in your yard or neighborhood? 

Model Magic Clay
 Flowers with Pipe Cleaners 
I have created numerous art lessons on the educational website Mr. Giannetto for Fantastic Fun and Learning which can be an additional art resource for you. The art activities can be adapted and modified for your child's age and ability level. This creative play art activity combines air dry clay and pipe cleaners and is great for fine motor skill development. 
Give it a try! 


Monday, September 27, 2021

Remote Art Class: Week 4

 Welcome to Remote Art Class with Mr. Giannetto

2021-2022 School Year

Scroll down to view art projects and resources for Week 4. 

STEAM Challenge: Build a Boat 

Build a boat for a small toy figure. The goal is to keep the toy safe and dry!  You also need to keep the boat afloat. Weight, balance, and the design/construction of your boat are all important factors to keep in mind. 


STEAM (Science, Technology, Engineering, Art, and Math) exploration boosts the development of critical thinking skills, problem solving skills, hands-on learning, and creative thinking.

Materials: small toy figure, paper plate, tape, scissors, a large bowl, sink, or tub of water

Optional Building Materials: cereal box, paper tubes, tinfoil, paper cup, straws, bubble wrap, construction paper, water bottle, etc.  

Warm up: Pick a small toy figure from your collection and identify the type of boat that you would like to make. Recall different types of boats such as sailboat, cruise ship, rowboat, canoe, speed boat, etc. 

Identify parts of the boat that you will need to make, including the sails of the boat, the bottom of the boat, and railings to keep your toy safe.

Step 1: Begin to build your boat. Make sure to create all the parts of the boat you named earlier. Each boat will be one of a kind! Have fun and try different ideas! 

Step 2: Put your boat into the water and add the toy inside. 
Oh no! My toy figure fell into the water! Yikes! My boat is sinking! That’s okay! We can learn from our mistakes and try again. 

Talk About Art
What type of boat did you make?
What was the most challenging part of building the boat? 
Did your toy figure stay dry? 


Vincent van Gogh Sunflowers


Earlier in the school year we created our own Starry Night landscape based on the artist Vincent van Gogh's famous painting. We used black tempera paint and oil pastels. We tried to represent van Gogh's style of art by focusing on bright colors, movement, and layering dashes of color to mimic the thick paint on the canvas. 


Warm up: Recall the trick that Mr. G taught you to remember the artist's name.
 Point to Mr.G (my first name is also Vincent). Use your hands to pretend you are driving a van. Lastly, press your foot on the pedal to make the van Gogh!

Vincent van Gogh

   Today we're going to look at Vincent van Gogh's series of Sunflower paintings. 
What do you see when you look at the painting? What do you smell? Can you find flowers in all stages of life including flower buds, blooms, and wilting flowers? Why are some of the flowers drooping? 


Materials: construction paper, scissors, glue stick, crayons 

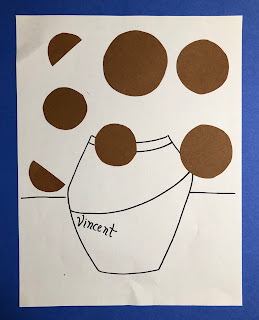
Step 1: Print out this vase pdf or draw one of your own. 

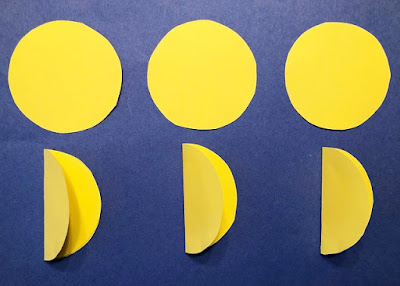
Step 2: Cut out 4-5 small brown circles. Cut one of the circles in half. Glue them to the vase paper to create the center of each flower. Be sure to space them out. The half circles will be used to create a bloom in profile. 


Step 3: Cut stems, leaves, and triangles. 


Step 4: Begin to glue the stems to each flower. It's a nice idea to sneak the end of the stem a bit under the brown circle. Next, glue a few leaves to each stem. Finally, glue the triangles around each brown circle to create petals. To create a pop up petal, glue the base of the triangle down and bend up the remaining portion. On the brown half circles add a few triangles to the flat side to create a bloom in profile. 


Step 5: Color the vase and the background.


Talk About Art

What type of flowers did you create?

Name the artist that goes along with the lesson.

How many buds, blooms, and wilting flowers do you see in your work? 

Monday, September 20, 2021

Remote Art Class Week 3

 Welcome to Remote Art Class with Mr. Giannetto

2021-2022 School Year

Scroll down to view art projects and resources for Week 3. 

Chalk the Walk 

You may have seen this outdoor art activity spreading across the country and all over social media. Let’s bring some cheer and uplifting messages to Burlington Township! If you have sidewalk chalk, head outside and draw on your driveway or sidewalk. Rainbows, flowers, smiles and more are sure to brighten our spirits. Try using painter's tape to add a geometric color blocking design. Add messages of thanks and hope for our community! 

Handprint Fish 


Materials: paper, watercolor paint, brush, water, scissors, glue, construction paper 
If paint is not available use crayons and/or markers. 

Step 1: Trace your hands three times on a piece of paper. Spread out your fingers and trace carefully and slowly. Paint the hands with watercolor paint. To produce a bright color be sure to make circles or go "round and round" with your brush in the paint pan. Remember to hold your paintbrush like a pencil. 


Step 2: As the paint is drying begin to create an underwater scene for the fish. Cut out waves, seaweed, and sand. What else could you add to the sand? Seashells? A starfish? 
Glue down all of the pieces. Feel free to use markers to add the waves and seaweed if construction paper is not available.  


Step 3: Cut out the painted hands. Remember the song that we sing in class..."Follow the line, every time, do your best, clean up your mess." Begin to glue the hands to the underwater scene. Glue the tail first and layer the other hands overlapping as you go. 


Step 4: Add any other details including an eye and mouth. Optional: follow the step by step drawing directions to add seashells to your work. 


Talk About Art
Recall the different art supplies you used to create this project.
What part of the project did you enjoy the most?
Which part was the most challenging? 

Monday, September 13, 2021

Remote Art Class Week 2

 Welcome to Remote Art Class with Mr. Giannetto

2021-2022 School Year

Scroll down to view art projects and resources for Week 2. 

Folded Paper Owl


Step 1:Cut out a circle.
Step 2: Fold in the right and left sides of the circle to make the owl's wings.
Step 3: Fold down the top of the circle to make the owl's head.
Step 4: Cut out a variety of details such as eyes, a beak, feet, and feathers. Glue all of the pieces onto the owl.

Art Challenge: Teach a family member how to make the paper owl. 


STEAM Challenge: Create a chair to support a small stuffed animal.

STEAM (Science, Technology, Engineering, Art, and Math) exploration boosts the development of critical thinking skills, problem solving skills, hands-on learning, and creative thinking.


Art Materials: Choose 3 of the following materials you may have around the house: paper, cardboard, cereal box, paper plate, paper tubes, or straws


Additional Art Materials: scissors and tape

Warm Up: Review different types of chairs such as a desk chair, folding chair, rocking chair, recliner, stool, lawn chair, wheel chair, high chair, throne, and sofa. Do you have any of those types of chairs in your house?

Identify different parts of a chair such as the back, arms, legs, and seat. 

Step 1: Begin to build your chair. Make sure to create the seat, arms, and back of your chair. Remember each chair will be one of a kind! 
                   

Step 2: Check if the chair can support the weight of your stuffed animal. Is it okay if the chair collapses under the weight of the stuffed animal? Yes! We can learn from our mistakes and try again! 

Talk About Art
What type of chair did you make?
What was the most challenging part of building the chair?
Is your stuffed animal comfortable in the chair?
Is your stuffed animal safe in the chair?


Friday, September 3, 2021

Remote Art Class Week 1

 Welcome to Remote Art Class with Mr. Giannetto

2021-2022 School Year

Scroll down to view art projects and resources for Week 1. 


Art Lesson: Torn Paper Owlets 

Materials: construction paper (choose any colors you wish and have available at home), scissors, markers, glue stick 

Five Owl Facts for Kids

1. A baby owl is called an owlet.

2. There are over 200 different kinds of owls. They are different colors and different sizes. 

3. Owls have large eyes and a flat face.

4. Owls are active at night. They are nocturnal.

5. Owls eat bugs, small animals, birds, and/or fish.


Step by Step Directions:

1. Draw the Owlet

Draw a large oval for the owl's body. Draw two triangles for ears at the top of the oval. Finally, draw two wings.

2. Rip the Paper

Pick a color you would like to use for the owl's feathers. Cut the paper into strips. Make small snips down the length of the strip. Rip the paper into pieces. Glue the pieces to the drawing to create feathers on the owl. Try to cover the whole owl.

Remember to pat down the pieces so that the owl doesn't lose its feathers!

3. Add Details

Cut out a diamond shape and fold it in half to make an open beak. 

Cut out small strips of paper for the legs and toes.

Trace a cup onto paper and cut out the two circles for eyes. Use a marker to draw the pupils. 

Glue on all of the pieces.

If you wish you may use a marker to draw the owl details instead of cutting and gluing due to time constraints.

Extend this Art Activity - Optional

Recall the 5 Owl Facts for Kids.

Draw food for your owl to eat.

Make a mom or dad owl to go along with the owlet.


Found Object Plate Portraits

Build a portrait with various objects you can find around the house!

Step 1: Pick a plate and collect an array of objects from your house including small toys, kitchen items, office supplies, and more!
Step 2: Identify parts of the face and sort the items into categories such as eyes, noses, mouths, hair, ears, and such.
Step 3: Create a portrait using the objects. Move the items around to see what works best! Have fun!
Step 4: Take a photo so I can see your creative one-of-a-kind portraits!
Step 5: Return all items where they belong.

Mr. G made the 4 plate portraits below.