Sunday, April 26, 2020

Online Art Lessons-Week 6


Welcome to Art Class at B. Bernice Young School!

Virtual Learning Week 6: Choice Board Week


These online art lessons are provided to you electronically in order to continue art instruction at home while school is closed.

If you have any questions or concerns please email Mr. Giannetto. 

Please also follow me on Facebook: Young School Art with Mr. Giannetto
and Instagram @youngschoolartwithmr.g for additional art activities.


Congratulations Young School Artists! 

I'm so proud of all my students who have been creating fantastic artwork at home! Here's a shoutout to Young School's Distance E-Learning Star Students of the week!
 (All photos are posted with parental permission. Additional artists will be highlighted each week.To have your child participate please include permission to post in your email).


Kindergarten, 1st Grade, and 2nd Grade: Choice Board

This week I’m changing things up and introducing a Choice Board! I understand that art supplies at home may be running low, so many of this week's projects use household items and incorporate play into art making.

Pick one art activity from the Choice Board below to complete for art class this week. Check the art supplies you have available and pick a project to make! Some of the projects are student favorites and others are brand new activities. 


Each art activity on the board has a number. Scroll down to find the corresponding set of directions. Each activity has modifications provided for you to adjust the activity depending on your child's grade and ability level. Have fun! Feel free to adapt each lesson with materials that you have available at home. Each lesson is open ended and promotes student choice. Many are STEAM Learning activities and Creative Play activities. 

STEAM
STEAM (Science, Technology, Engineering, Art, and Math) exploration boosts the development of critical thinking skills, problem solving skills, hands-on learning, and creative thinking.

Creative Play 
Playing is learning! Creative play is relaxed, flexible, and encourages freedom through trial and error. Let self-expression and your imagination take over.
When your artwork is complete please email me a photo of your work and include your name and classroom teacher's name in the email.
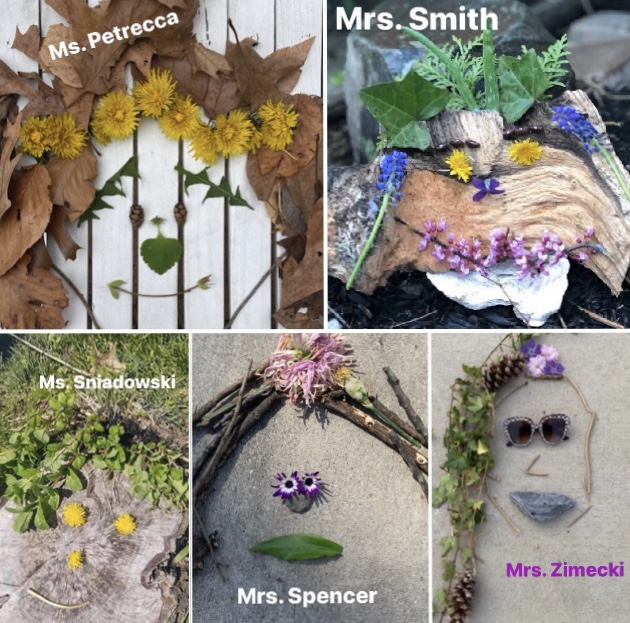
  Option #1: Nature Portraits

This challenge is inspired by the Instagram account @facethefoliage.

Challenge: Create a face using things found in nature such as leaves, sticks, flowers, rocks, grass, and more.       

Step 1: Collect an array of items from nature.
Step 2: Identify parts of the face and sort the items into categories such as eyes, noses, mouths, hair, ears, and such.
Step 3: Create a portrait using the objects. Move the items around to see what works best!


Modifications: 1. Create a self-portrait nature face by looking in a mirror as you're working.
                       2. Make your nature face symmetrical (same on both sides).
                       3. Sketch a drawing of your finished work. 

 Option #2: Build a City


Challenge: Build a city using materials you can find in your home. One building needs to be able to hold the weight of a small toy figure or toy car. Use what you have around the house such as blocks, books, paper cups, styrofoam, toothpicks, k cups, index cards, cardboard, coasters, and more. Use small toy figures or toy cars to complete the challenge.

Step 1: Gather your building supplies and small toys. Find a flat surface to build on such as a kitchen floor, table, or big books. 
Step 2: Begin to build by placing 4 foundation pieces at the bottom and put a piece of paper, cardboard or other flat material on top to create the floor. Experiment with other building techniques as you go. 
Step 3: Keep stacking higher and higher! Oh no! My building fell! That’s okay! Try again! 
Step 4: Add small toy figures to your building. Yikes! The building collapsed! That’s okay! Learn as you go! Is there a stronger material you can use to support the toy?
Step 5: Play with your city.
Step 6: Put back all of the building supplies where they belong. 

Modifications: 1. Add multiple or heavier toy figures or cars to your buildings.
                       2. Sketch a drawing of your city. 
                       3. Create a city inspired by NYC, Philadelphia, Paris, or London. 


Option #3: Found Object Plate Portraits

Challenge: Build a portrait with various objects you can find around the house!

Step 1: Pick a plate and collect an array of objects from your house including small toys, kitchen items, office supplies, and more!
Step 2: Identify parts of the face and sort the items into categories such as eyes, noses, mouths, hair, ears, and such.
Step 3: Create a portrait using the objects. Move the items around to see what works best!
Step 4: Return all items where they belong.


Modifications: 1. Create a self-portrait plate face by looking in a mirror as you're working.
                       2. Make your face symmetrical (same on both sides). 
                       3. Sketch a drawing of your finished work. 


Option #4: Disguise a Stuffed Animal

Challenge: Create a disguise for a stuffed animal. Use construction paper, scissors, and tape to turn your stuffed animal into a different animal. 

Step 1: Choose a stuffed animal from your collection and decide how you can disguise it. Maybe turn your teddy bear into a bird or your doll into a rabbit. 
Step 2: Begin to cut out various items and tape them onto your stuffed animal. 
Step 3: Quiz your family and see if they can guess who is in disguise. 

Modifications: 1. Use clothes from another toy and repurpose them.
                       2. Sketch a drawing of your finished work.
                       3. Compare and contrast your toy before and after its transformation. 

Option #5: Found Object Butterflies

Please click this link to go to the lesson I wrote for Fantastic Fun and Learning.

https://www.fantasticfunandlearning.com/found-object-butterfly-craft.html

Option #6: Build a Boat

Challenge: Build a boat for a small toy figure using paper plates, tape, scissors, and a  large bowl, sink, or tub of water. Additional building materials include cereal boxes, paper tubes, tinfoil, paper cups, straws, bubble wrap, construction paper, a water bottle, etc.  The goal is to keep the toy safe and dry!  You also need to keep the boat afloat. Weight, balance, and the design/construction of your boat are all important factors to keep in mind. 

Step 1: Pick a small toy figure from your collection and identify the type of boat that you would like to make. Recall different types of boats such as sailboat, cruise ship, rowboat, canoe, speed boat, etc. 
Step 2: Identify parts of the boat that you will need to make, including the sails of the boat, the bottom of the boat, and railings to keep your toy safe.
Step 3: Begin to build your boat. Make sure to create all the parts of the boat you named earlier. Each boat will be one of a kind! Have fun and try different ideas! 
Step 4: Put your boat into the water and add the toy inside. 
Oh no! My toy figure fell into the water! Yikes! My boat is sinking! That’s okay! We can learn from our mistakes and try again. 

Modifications: 1. Write a story about your boat. Where is it going?
                       2. Sketch a drawing of your boat.
                       3. Add multiple toys or heavier toys to your boat.


Option #7: Muffin Tin Marble Maze

Please click this link to go to the lesson I wrote for Fantastic Fun and Learning.

Option #8: Build a Chair

Challenge: Build a chair for a stuffed animal using paper, scissors, tape, cardboard, a cereal box, paper plates, paper tubes, or straws.

Step 1: Review different types of chairs such as a desk chair, folding chair, rocking chair, recliner, stool, lawn chair, wheel chair, high chair, throne, and sofa. Do you have any of those types of chairs in your house?
Step 2: Identify different parts of a chair such as the back, arms, legs, and seat. 
Step 3: Begin to build your chair. Make sure to create the seat, arms, and back of your chair. Remember each chair will be one of a kind! 
Step 4: Check if the chair can support the weight of your stuffed animal. Is it okay if the chair collapses under the weight of the stuffed animal? Yes! We can learn from our mistakes and try again! 

Modifications: 1. Sketch a drawing of your finished work.
                       2. Use a larger or heavier stuffed animal to test your chair. 
                       3. Use a small toy figure to test your chair. 

The Burlington Township School District is committed to making our website accessible for students, staff, and the community. You may request information in an alternate format. Please contact the community relations office to make requests.


Sunday, April 19, 2020

Online Art Lessons-Week 5


Welcome to Art Class at B. Bernice Young School!

Virtual Learning Week 5

I hope you had a restful, fun, and wacky Spring Break! 


These online art lessons are provided to you electronically in order to continue art instruction at home while school is closed.

Please scroll down and find your grade level lesson. Be sure to also check out the optional art challenge of the week! This week's challenge celebrates Earth Day!

Feel free to adapt each lesson with art materials that you have available at home. 
Each lesson is open ended and promotes student choice. Try your best and have fun! 

When your artwork is complete please email me a photo of your work and include your name and classroom teacher's name in the email.

I can't wait to see your beautiful artwork! 

If you have any questions or concerns please email Mr. Giannetto. 

Please also follow me on Facebook: Young School Art with Mr. Giannetto
and Instagram @youngschoolartwithmr.g for additional art activities.

 I have created numerous art lessons on the educational website Mr. Giannetto for Fantastic Fun and Learning which can be an additional art resource for you. The art activities can be adapted and modified for your child's age and ability level. This creative play art activity combines air dry clay and pipe cleaners and is great for fine motor skill development. 
Give it a try! 

Earth Day Art Challenge of the Week: Nature Portraits

This is an optional art activity for all Young School students, families, and staff. 

This challenge is inspired by the Instagram account @facethefoliage.

Challenge: Create a face using things found in nature such as leaves, sticks, flowers, rocks, grass, and more.

Portraits created by Mr. G and Jessica Spencer. Thank you Jess!


Congratulations Young School Artists! 

I'm so proud of all my students who have been creating fantastic artwork at home! Here's a shoutout to Young School's Distance E-Learning Star Students of the week!
 (All photos are posted with parental permission. Additional artists will be highlighted each week.)


Kindergarten-Paper Flower Craft 


Materials: construction paper, pencil, scissors, glue, paper tube, paint, q-tips 

Step 1: Use a paper tube to stamp circles onto blue paper. If paint is not available use a blue crayon to draw circles on the paper. 


Step 2: Begin to make your paper circles. These will be the center of the flower and the petals. Use a small cup to trace 6-8 circles for the petals. Make one extra circle that will become the center of the flower. 
  
Step 3: Cut out the circles and fold 6-8 circles in half to make the petals. 


Step 4: Glue on one circle for the center of the flower. Glue the folded circles to create each petal. 

Step 5: Add details to your project including a stem, leaves, and soil. If you wish to have the leaves pop up, fold green paper in half and draw half of the leaf on the fold. When you cut it out you will have a complete leaf.


Step 6: Use a q-tip to paint seeds inside the center of the flower. If paint is not available use markers or crayons. 


Talk About Art: How many circles do you see in your artwork? What does your flower need in order to grow? Can you spot any flowers like this in your yard or neighborhood? 


1st Grade-Cactus Friends


Materials: pencil, construction paper, crayons, markers, paint, brush, scissors, glue

Step 1: Draw a cactus in a pot. A rectangle or square can make a nice pot. For the cactus draw a long curved shape coming out from the top of the pot. Add the arms as you like. 
                          
   
Step 2: Paint the cactus light green by adding some green paint to white paint in order to create a tint of green. Paint the pot whatever color you wish. Let the paint dry.


Step 3: After the paint dries use markers to add details to the cactus. Trace the cactus with a green marker and add black spines. Trace the pot and add details. 


Step 4: Use crayons to draw a variety of lines in the background. Can you draw straight, curvy, zigzag, spiral, and dotted lines? Can you make a pattern?


Step 5: Add a face to the cactus. Cut out two small white circles and glue them down to make eyes. Add a black eyeball, nose, mouth, eyebrows, eyelashes, and other details with markers. Think about if you want to create a happy, surprised, or excited cactus.


Talk About Art: Name your cactus friend. How is he or she feeling? Happy? Excited? Surprised? Shy? Identify the different types of lines in the background of your picture. Did you create a pattern? 

2nd Grade-Earth Day 


Materials: newspaper, pencil, scissors, glue, watercolor paint, brush 

Warm-Up: Introduce/review the following terms: Reduce (use less), reuse (use again), recycle (reprocess into new item).

Step 1: Draw a large circle to represent the earth on a piece of newspaper. Trace a plate to make the circle if you wish. Draw the large land areas on the earth. 


Step 2: Use watercolors to paint the land green and water blue. Let your work dry.


Step 3: Draw 3 arrows on newspaper and cut them out. To make an arrow draw one long thin rectangle and draw a triangle on the end. If you wish cut out all three arrows at once by layering your paper before you cut. 

Step 4: Cut out the earth and glue it to a piece of paper. Fold the arrows in half and glue them around the earth. 


Step 5: Cut out letters from the newspaper to spell reduce, reuse, or recycle and glue them to your paper. 

Talk About Art: Discuss examples of how you reduce, reuse, and recycle every day. 


The Burlington Township School District is committed to making our website accessible for students, staff, and the community. You may request information in an alternate format. Please contact the community relations office to make requests.


Sunday, April 5, 2020

Online Art Lessons-Week 4


Welcome to Art class at B. Bernice Young School!

Virtual Learning Week 4


These online art lessons are provided to you electronically in order to continue art instruction at home while school is closed.

Please scroll down and find your grade level lesson. Be sure to also check out the optional art challenge of the week! It's one that gives thanks to all of our community helpers. 

Feel free to adapt each lesson with art materials that you have available at home. 
Each lesson is open ended and promotes student choice. Try your best and have fun! 

When your artwork is complete please email me a photo of your work and include your name and classroom teacher's name in the email.

I can't wait to see your beautiful artwork! 

If you have any questions or concerns please email Mr. Giannetto. 

Please also follow me on Facebook: Young School Art with Mr. Giannetto
and Instagram @youngschoolartwithmr.g for additional art activities.

 I have created numerous art lessons on the educational website Fantastic Fun and Learning which can be an additional art resource for you. The art activities can be adapted and modified for your child's age and ability level. A fun process art activity you can try is called Three Ways to Paint with a Carrot! For details click the link below.


Art Challenge of the Week: Heart Art

Print out this heart coloring sheet or draw a heart on a piece of paper. Draw, color, and doodle images of hope, love, and thanks for the community on the paper. Hang it in your window to spread love, thanks, and cheer to those that walk by your house. 
How many hearts can you spot in your neighborhood? 

   
Kindergarten: STEAM Learning - Build a City

STEAM (Science, Technology, Engineering, Art, and Math) exploration boosts the development of critical thinking skills, problem solving skills, hands-on learning, and creative thinking.

What types of buildings will be in your city? Maybe a skyscraper and a car garage? 
How many floors will your building have? How tall will your building stand? Is your building sturdy and strong? 

Challenge: Build a city using materials you can find in your home. One building needs to be able to hold the weight of a small toy figure or toy car.

Materials: Use what you have around the house such as blocks, books, paper cups, styrofoam, tooth picks, k cups, index cards, cardboard, coasters, and more. Use small toy figures or toy cars to complete the challenge.

Step 1: Gather your building supplies and small toys. Find a flat surface to build on such as a kitchen floor, table, or big books. 

Step 2: Begin to build by placing 4 foundation pieces at the bottom and put a piece of paper, cardboard or other flat material on top to create the floor. Experiment with other building techniques as you go. 

Step 3: Keep stacking higher and higher! Oh no! My building fell! That’s okay! Try again! 


Step 4: Add small toy figures to your building. Yikes! The building collapsed! That’s okay! Learn as you go! Is there a stronger material you can use to support the toy? 


Step 5: Play with your city. 

Step 6: Put back all of the building supplies where they belong. 


Talk About Art
Were you successful at building a city?
What was the most challenging part?
What type of materials were the easiest to build with?
Which building was strong enough to hold the weight of your small toy?


1st Grade: Build Your Neighborhood 


Warm up: Think about what you can identify in your neighborhood. Start with your home and your school and then recall other landmarks including a favorite place to dine and your favorite place to shop. 

Art Materials: construction paper, glue stick, scissors, and markers 

 Step 1: Cut out a variety of squares and rectangles that will represent various buildings in your neighborhood. 


Step 2: Fold up the bottom edge of each square and rectangle. This will create the base which later will be glued down on a piece of paper. As a result, your buildings will pop up vertically. 


Step 3: Add details to your building by cutting out small squares and rectangles and gluing them down to create windows and doors. Or you can draw those details on with a marker. 

Step 4: Cut out triangles or trapezoids to make the roofs and glue them on as well. Glue the bottom base of each building to a piece of paper in order for the buildings to stand up. 


Step 5: Draw or add paper details to each building as desired and glue them down. I added a flag to the school, the target symbol to a large building, a tree in the yard, and pizza to the restaurant building. 

Step 6: Label your map.   


Talk About Art
What was the most challenging part of this art project?

What building on the map is your favorite?


2nd Grade: Cardboard Tinfoil Robots

Robots can help us with everyday tasks. What would you like your robot to do? What is its function? Maybe you would like a chef, maid, or teacher robot? A robot that can cook, clean, and do your homework may be very popular! 


Identify the following: 
A robot name
A robot function (How does it help you?/What does it do?)
A robot price (How much does it cost?) 

Art Materials: cardboard, cereal box, scissors, tinfoil, glue, paper, sharpie

Step 1: Cut a variety of shapes out of cardboard and/or cereal boxes. Rectangles, squares, and circles would be great! Parents may need to assist with cutting out some of the thicker cardboard pieces. 


Step 2: Begin to wrap the pieces of cardboard in tinfoil. 


Step 3: Move the pieces around and decide what works best to create the robots head, body, arms, wheels or legs.


Step 4: Use a sharpie to add details to your robot including a face, computer screen, nuts and bolts, and other details. As you're adding details make sure the design meets the function of your robot. For example, if the robot is a teacher you can add books or a pencil. If your robot makes dinner be sure to add food and utensils. 


Step 5: Glue the pieces to a piece of paper and write down the name, function, and price of your robot.


Talk About Art
What was the most challenging part of making a robot?
What is the function of your robot?
Does your family want to buy your robot?


The Burlington Township School District is committed to making our website accessible for students, staff, and the community. You may request information in an alternate format. Please contact the community relations office to make requests.